Tuesday, July 16, 2013

Easy Homemade Granola Bars

Homemade granola bars have become one of my favorite go-to real food snacks for on the go. (Huh, say that sentence five times fast) Made with all natural ingredients that I have accessible all the time, and endlessly adaptable, these bars taste great, are filling, and have both protein and fruit!


Living Design: Easy Homemade Granola Bars

These bars are also incredibly easy to make, which makes them a perfect way to get kids involved in the kitchen. Let small kids stir the dry ingredients while you measure, and let bigger kids take more control over everything from measuring to altering the recipe to include their favorite dried fruit.

I found the original recipe in the January 2013 edition of Martha Stewart's Whole Living. Her recipe is here. But, in order to show you how endlessly adaptable this recipe is, here is how I made it this week:

Homemade Granola Bars


Ingredients:

1 cup crushed shredded wheat (you know, the dregs at the bottom of the cereal bag that no one wants to eat - this is how to use them up)
2 cups oatmeal
1/2 cup dates
1/2 cup mixed raisins and Craisins
2 tsp ground cinnamon
1 tsp Kosher salt
1/2 cup peanut butter (use your favorite nut butter)
1/4 cup honey (yes, less than the original)
1/2 cup apricot puree (any fruit puree will work)
3 Tbsp orange juice
4 Tbsp ground flaxseed meal
1/4 tsp vanilla extract

1. Preheat the oven to 350F. Oil an 8x8 pan.
2. In a mixing bowl, combine cereal, oats, dates, dried fruit, cinnamon and salt. Mix to combine.
3. In another bowl, combine flaxseed meal and all wet ingredients. Mix well so that no large clumps of peanut butter remain.
4. Add wet ingredients to dry, and mix well. Add more fruit puree if needed to get a nice batter-like consistency throughout.
5. Press mixture into 8x8 pan and smooth out the top. Be sure to press it into the pan evenly so that the bars won't crumble after baking.
6. Bake for 30 minutes until golden brown.
7. Let cool completely, then cut into squares. I do 9, if you have young kids you may like to cut them smaller. Store in an airtight container for up to 5 days.

Have fun making Martha's version or mine, and then experiment with your own combinations! Let me know if you come up with some delicious new version, I love trying new combinations since I make a batch every couple weeks.


***

Linked up to:

Wednesday, July 10, 2013

Traveling with Real Food and Minimal Waste

Last weekend, Sean and I spent a few days at a cabin in the Santa Cruz mountains. It was a wonderful romantic getaway for our anniversary, with day trips out to Monterey for the aquarium and Santa Cruz for the Boardwalk, as well as time spent "in camp" hiking the state park and wading in the river.

Living Design: Traveling with Real Food and Minimal Waste
 the river near our cabin


One of our goals for this getaway was to continue our efforts of eating a real food diet, as well as drastically reducing our waste. I recently borrowed Zero Waste Home from a friend, and we've been more inspired than ever to eliminate our waste. We certainly weren't perfect at achieving either zero waste or only real food, but here is what we did and what we learned for next time:


Friday dinner: BBQ at the cabin. Chicken sausages (some packaging), grilled veggie packets (aluminum foil was recycled, need to buy a grill basket to avoid the use of foil in the future), and sourdough flatbreads. I portioned out the dry ingredients for the flatbreads ahead of time, so all we had to do was mix the amount of sourdough starter in with the dry, a little water and olive oil, and then let them rise and grill!

Living Design: Traveling with Real Food and Minimal Waste
 balls of flatbread about to rise

While spending time outside the cabin grilling, we got to know our "camping neighbors." It was interesting to me hearing the men compare their dinners. The conversation was something like this,
"What are you grilling?"
"Ribs, you?"
"Tri-tip. What about you Sean?"
"Oh, we've got chicken sausages, veggie packets and some homemade sourdough flatbreads."
That's my gourmet grill chef!

Breakfasts: honeydew melon, hard boiled eggs, homemade sourdough toast with homemade kumquat marmalade (melon rinds and egg shells would be compostable if the facility had green waste bins, but sadly they did not)

Lunches: we packed our lunch each day using leftover sausages from the first dinner either sliced onto some sourdough bread or rolled into leftover flatbread. Carrots, oranges and homemade granola bars were brought from home and packed into reusable bags

For dinner on Saturday and Sunday we ate out. We were careful about portion size so that we didn't need to bring any leftovers home with us.

This was our first trip while being actively conscious about eating a real food diet, so it took a bit more upfront planning than we were used to. There were a number of things we brought from home that previously would have just been purchased at the market near the cabin, like eggs and bread. By bringing from home, we could control the ingredients (no additives in the bread) and feel confident in the source (we buy our eggs direct from a farmer at the farmers market). It also reduces waste since there was no double wrapped bread packaging or disposable egg carton (ours get returned to the farmer each week).

We did buy milk there, and unfortunately the only options in the correct portion were non-recyclable containers. I'm hoping we start seeing more recyclable or reusable options in milk packaging across all sizes.

We're already working on ideas for our next trip to help us eat clean and reduce our waste at the same time, even when away from home.

If you have any tips for eating real food while traveling, or reducing waste on the road, please share in the comments! I'd love to hear more ideas.


***

Linked up to:


Monday, July 8, 2013

Bathroom and Vanity Reveal

This week I finally got the bathroom and vanity area prettied up to photograph, such that they're finally ready to be shared on the blog! It's so exciting for me when I decide a room is "blog-ready"!

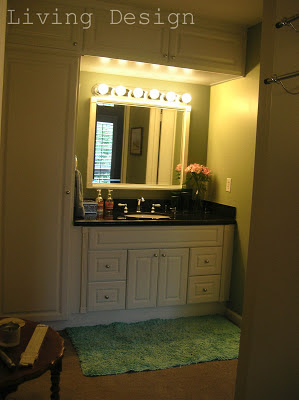
The vanity area is to the left of the entryway. It's almost more of a square hallway with a sink and cabinetry than a room unto itself, but I've been adding some touches to make it feel more like a "place" than a "walk-through".

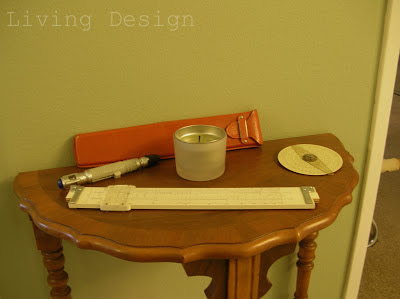
Below is a photo looking back towards the entryway (you can see the frames in the mirrored closet doors that are also seen here) This little half-round table goes a long way in making the vanity feel more like a room.

Living Design: Bathroom and Vanity

On top of the table is a little candle that happens to match the color of the walls (pure accident, the cousins who gave us the candle hadn't seen our paint choices yet at that point!). We also have Sean's collection of slide rules, and the sonic screwdriver. They make a perfect transition into the office, which is immediately to the left of this picture.

Living Design: Bathroom and Vanity

Looking at the vanity area, from the office:

Living Design: Bathroom and Vanity

Living Design: Bathroom and Vanity

Living Design: Bathroom and Vanity

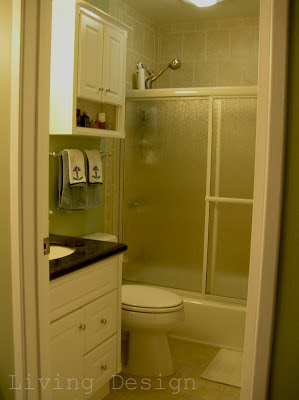
Opposite the doorway to the entryway is the door into the actual bathroom.

Living Design: Bathroom and Vanity

Below, on the left are Sean's old-fashioned razors. The brass one was his grandfather's. On the right, an empty jar from the best orange marmalade, which I got when I was studying abroad in Italy. It acts as a toothbrush holder.

Living Design: Bathroom and Vanity

Well, that's all for now in the bathroom! It was fun arranging everything to photograph. What room should I tackle next to reveal here?

Friday, July 5, 2013

Design Finds of the Week #4

While doing visual research for both my design classes and for the different plays I'm working on, I come across some fascinating design inspiration. A few of my finds this week:

It's been a couple months since I did one of these posts, but that doesn't mean I stopped looking at great design! Here are a couple fascinating designs from Architectural Record's "Design from Farm to Table" Series:

An egg shaped chicken coop in lovely bent wood

A dairy barn at Cornell University where creature comfort is paramount

Wednesday, July 3, 2013

Summer Garden Update

It's been a while since I've posted about our balcony garden. The plants have grown so much since my last post!

When you first step onto the balcony from the living room, this pot of beans is to the left:


It doesn't get as much sun as other areas of the balcony, so it's a little slower at growing. But those big leaves take advantage of all the sun it gets!

Straight in front of the door is our deck box, which holds extra gardening tools and grill supplies. We have a few easily moveable pots sitting on top, like this pot of green onions:


These green onions were sprouted from the ends of some store-bought green onions back in December. I put the white ends with the roots into a short glass with water, and just changed out the water every couple days. I was able to keep them like that for a few months, just trimming off what I needed. But by late spring the onions were growing more than I could eat, so we had to plant them in a pot. And look how they've taken off! These are the thickest green onions I've ever seen, and they have a great flavor.

On the other side of the door, next to one of our chairs, is our other bean. This one gets more sun so has grown taller. 


Moving along the rail now, we have two terra cotta pots with tomatoes. Our tomatoes got off to a rough start this year. I started them from seed, and our late spring storms wrecked havoc on their growing cycle. But now that it's consistently warm, they're really taking off. Maybe tomatoes to eat in another month or so? We'll see.


Next is our nasturtium, which I've shown before. This guy is great for adding a flowering aspect to the balcony, as well as a great addition to salads. And I just started my first batch of nasturtium capers, which I'm excited about (details to come)


Next to the nasturtium is our strawberry pot. We've had some lovely strawberries this season, though none were ripe when I snapped this picture:


Between the strawberry pot and the lemon tree is our lettuce. It's a bit scraggly right now, since the last of our first crop bolted and our second crop hasn't sprouted yet.

The lemon tree has grown a few inches since we brought it home in January! Above it is a hanging basket of strawberries, and behind it is our sugar snap pea. Wow it's tall!


 Look at this mass of gorgeous snap peas!


 Much of this spring has been devoted to testing out the micro-climates of our balcony. Since part of the rail is metal, and part is solid wood, we get very different sunlight for pots on the ground. The wind at the third floor level is also completely different than that at ground level, so what works for the people below might not work for us. A lot of trial and error, a lot of dead plants, but lots of rewarding home-grown food too!

Monday, July 1, 2013

Things I'm Learning About Marriage

Today is July 1, the first anniversary of the day I married my wonderful husband.


It's been a crazy year, with me going to school full time and working part time, him working full time and going to school part time. Only one more year until we each have our Master's degrees!


During this crazy year, I've learned a lot about marriage. We lived together for almost two years before we tied the knot, but it is true that some things change once everything becomes permanent. Today I want to share a few tips I've learned about marriage in the last year.


1. People say don't go to bed angry. That's true. But also know the difference between anger and mere frustrated exhaustion. When we both have projects due the next day and I get annoyed that the dishes aren't done after he said an hour ago he would do them, and it turns into a huge deal because I've barely slept for two days...just go to sleep. After a good night's rest, lots of things sort themselves out. Something that seems worthy of a fight when you're exhausted may not be a big deal at all in the morning.


2. Before the wedding, lots of people reminded us to keep dating each other. Sounds nice, right? But with work and grad school, dates seem to get pushed to the back burner. Once we decided that anything could be a date as long as we called it one, we got a lot happier with those quick dinners on the way to paint a set. Who says eating at Panera Bread in paint-stained clothes isn't a date?


3. Be spontaneous. Doing things together without a plan is a great way to keep up the romance. This picture of Sean (above) was taken one day last October when we decided to drive down to Watsonville to go apple picking. Afterwards we went to the beach for an hour, then had dinner in Santa Cruz. All with only the vague idea ahead of time that we would go apple picking "sometime this fall." It turned into one of my favorite days of the fall!


4. Remember why you fell in love. This is so important. Whenever I'm stressed out, whether it's something that he did or just something with work or school, thinking back to our early days of dating always seems to calm me. 


5. Keep learning about each other. We change as we grow, so his opinions on XYZ might not be the same as they were 5 years ago, 2 years ago, or even 1 month ago before he borrowed that book from the library. Keep talking, keep learning. Together.


6. Nurture the other's interests, even when your interests may not collide. Actually, ESPECIALLY if those interests are separate. We need our alone time. Not because we don't love the other person and want to be with them, but because nurturing our separate interests helps us grow independently which I believe makes our conversations more interesting, which in turn makes the relationship stronger. It can be hard to feel connected to someone when you can't think of what to say. But talking about our individual passions always seems to bring us closer together, even though the listener might not really understand everything that is being talked about. His HAM radio club, my painting, etc.


7. Keep having fun! Be silly, and enjoy your time together!


I know that as the years roll on, I will learn a lot more from this amazing man, and our marriage. I look forward to each moment!